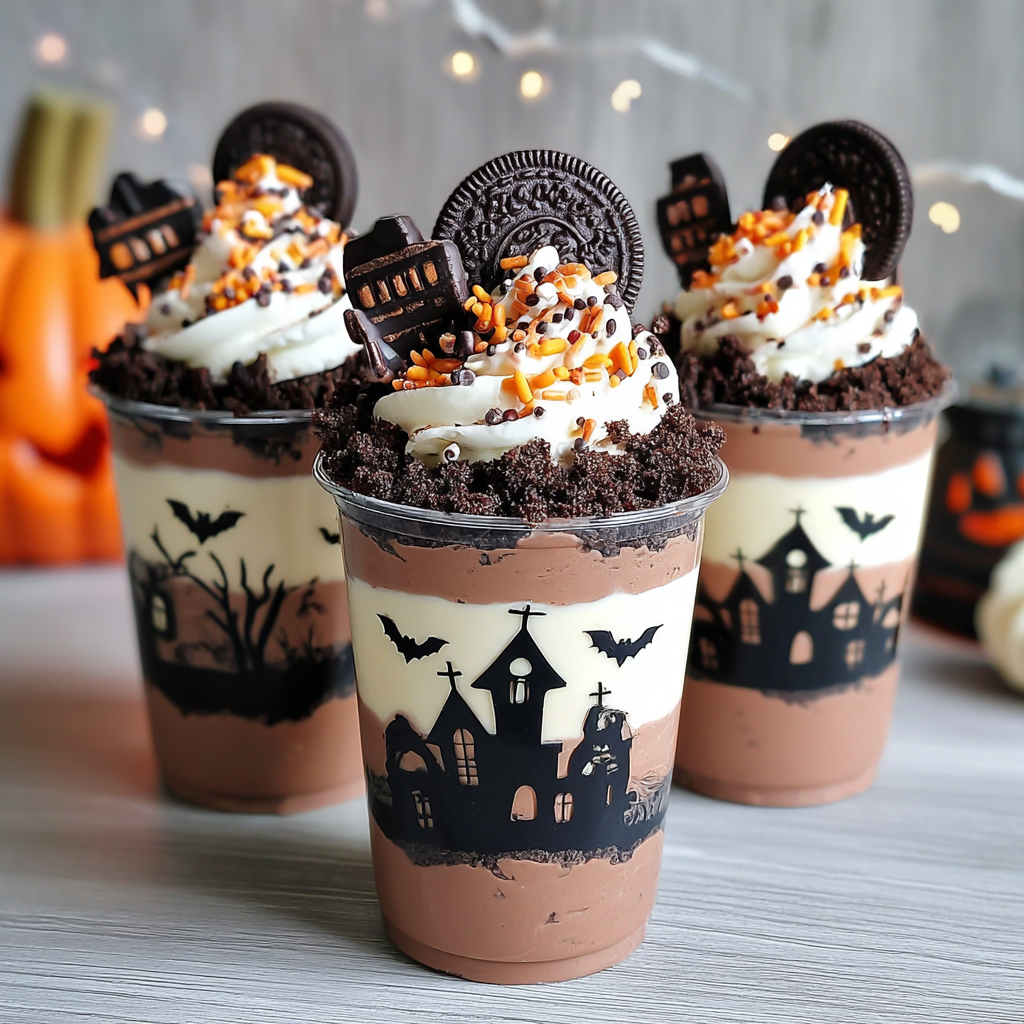
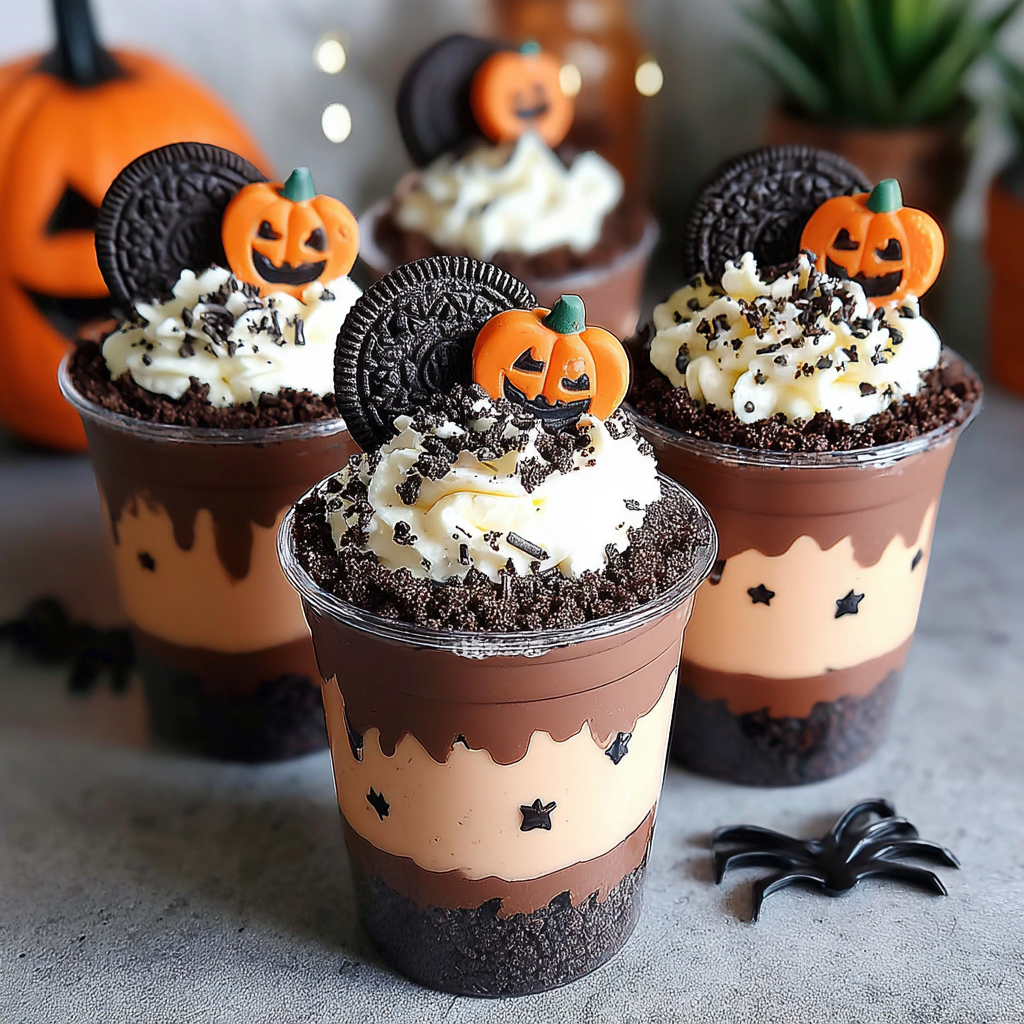
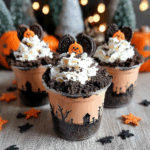
Graveyard Dirt Cups
Graveyard Dirt Cups are a spooky and scrumptious Halloween treat that will delight both kids and adults. These delightful cups feature layers of creamy chocolate pudding, crunchy crushed Oreos resembling dirt, and playful pectin-based gummy candies. Perfect for any festive gathering, this no-bake recipe is not only easy to prepare but also allows for creative customization, making it a fun activity for the whole family. Get ready to impress your guests with these eye-catching desserts that are sure to be a hit at your Halloween celebrations!
Why You’ll Love This Recipe
- Quick and Easy: This recipe takes just 15 minutes to prepare, making it perfect for last-minute celebrations.
- Endless Customization: Feel free to swap out ingredients like using vanilla pudding or different cookie types to suit your taste.
- Fun for Everyone: Kids love getting involved in the layering process, making it a great family activity.
- Eye-Catching Presentation: The combination of colors and textures makes these cups a standout dessert for any Halloween party.
- No Baking Required: Enjoy all the fun of dessert-making without the need for an oven.
Tools and Preparation
To make your Graveyard Dirt Cups smoothly, gather some essential tools beforehand. Having the right equipment will streamline the process and enhance your experience in the kitchen.
Essential Tools and Equipment
- Mixing bowl
- Whisk
- Food processor or rolling pin
- Clear plastic cups
- Resealable bag
Importance of Each Tool
- Mixing bowl: A good mixing bowl allows you to easily whisk together your pudding mix and milk without spills.
- Whisk: A whisk helps achieve a smooth consistency in your pudding, ensuring no lumps remain.
- Food processor or rolling pin: Crushing Oreos is easy with these tools; they save time and effort when preparing crumbs.
Ingredients
For the Pudding Layer
- 1 (3.9 oz) box chocolate pudding mix
- 2 cups whole milk
For the Dirt Layer
- 15 Oreo cookies, crushed
For Decoration
- 10 pectin-based gummy candies
- 1 cup whipped topping
How to Make Graveyard Dirt Cups
Step 1: Prepare the Pudding
In a mixing bowl, whisk together the chocolate pudding mix and whole milk until smooth. Let it sit for about 5 minutes until thickened.
Step 2: Crush the Oreos
Crush the Oreo cookies into fine crumbs using a food processor or by placing them in a resealable bag and smashing them with a rolling pin.
Step 3: Layer Your Cups
In clear plastic cups, layer the chocolate pudding at the bottom followed by crushed Oreos. Repeat until cups are filled.
Step 4: Add Whipped Topping
Top each cup with whipped topping to create a ghostly effect.
Step 5: Decorate with Gummies
Decorate with pectin-based gummy candies on top, making them look like they are crawling out of the ‘dirt.’
Step 6: Chill Before Serving
Chill in the refrigerator for 1 hour before serving.
These Graveyard Dirt Cups are not just delicious but also a fantastic way to celebrate Halloween creatively. Enjoy!
How to Serve Graveyard Dirt Cups
Graveyard Dirt Cups are a fun and festive dessert that can be served in various creative ways. Here are some serving suggestions to make your Halloween gathering even more exciting.
Individual Serving Cups
- Serve each cup in clear plastic dessert cups to highlight the layered look of the pudding and crushed Oreos. This presentation adds a playful touch.
Family-Style Bowl
- For a casual gathering, consider serving the Graveyard Dirt mixture in a large bowl and let guests help themselves. Provide spoons for easy access!
Themed Plates
- Use Halloween-themed plates or napkins to enhance the spooky vibe of your dessert. This small detail can make your table setting more festive.
Garnished with Extra Treats
- Top each cup with additional gummy candies or sprinkles for an extra dose of fun. It gives guests something special to look forward to!
Pair with Beverages
- Serve alongside themed drinks like pumpkin spice milkshakes or spooky punch. The combination will delight both kids and adults at your party.
How to Perfect Graveyard Dirt Cups
To ensure your Graveyard Dirt Cups turn out perfectly every time, consider these helpful tips.
- Choose quality ingredients – Use high-quality chocolate pudding mix and fresh milk for the best flavor and texture.
- Chill adequately – Refrigerate the cups for at least an hour before serving to allow flavors to meld and the pudding to set properly.
- Layer carefully – When layering, create distinct layers by pressing down on the crumbs lightly, ensuring each layer is visible.
- Customize toppings – Experiment with different gummy candies like worms or spiders for a themed twist that enhances visual appeal.
- Make ahead – Prepare the cups a day in advance; they store well in the refrigerator, making them perfect for busy schedules.
Best Side Dishes for Graveyard Dirt Cups
Pairing side dishes with your Graveyard Dirt Cups can elevate your Halloween feast. Here are some great options:
- Spooky Veggie Platter
A colorful assortment of vegetables arranged creatively with dips that resemble slime or monster eyes. - Witch’s Brew Soup
A hearty green soup made from blended spinach and peas, served warm in cauldron-like bowls for added theme effect. - Mummy Hot Dogs
Hot dogs wrapped in crescent roll dough resembling mummies, baked until golden brown, perfect finger food for kids. - Pumpkin Spice Muffins
Moist muffins fragrant with pumpkin spice, providing a sweet complement to the rich chocolate pudding dessert. - Ghostly Cheese Sticks
Mozzarella sticks decorated with edible eyes and ghostly designs using cheese slices or wraps, adding a fun element. - Candy Corn Fruit Salad
A vibrant fruit salad layered with yellow pineapple, orange cantaloupe, and white bananas resembling candy corn colors. - Witch’s Hat Nachos
Tortilla chips topped with black bean dip and guacamole served on a platter designed like witch hats for an eye-catching appetizer. - Monster Pizza Bites
Mini pizzas topped with silly faces using olives and bell peppers; they are fun to eat and fit perfectly into the Halloween theme.
Common Mistakes to Avoid
When making Graveyard Dirt Cups, avoid these common pitfalls for the best results.
- Using warm milk: Ensure the milk is cold when mixing with the pudding. Warm milk can prevent the pudding from thickening properly.
- Overcrushing Oreos: While fine crumbs are ideal, be cautious not to turn them into powder. Some texture adds to the dirt look and feel.
- Skipping chilling time: Allowing the cups to chill for at least 1 hour is essential for achieving the right consistency. Skipping this step may result in a runny dessert.
- Neglecting decoration: The fun of Graveyard Dirt Cups lies in their spooky appearance. Don’t skip adding gummy candies or other decorations to enhance the visual appeal.
- Not using clear cups: Using opaque containers hides the layers you’ve created. Clear cups let everyone see the fun and creativity in each cup.
Storage & Reheating Instructions
Refrigerator Storage
- Store leftover Graveyard Dirt Cups in an airtight container.
- They can be kept in the refrigerator for up to three days.
Freezing Graveyard Dirt Cups
- Freezing is not recommended as it may alter the texture of the pudding and whipped topping.
- If necessary, freeze individual cups but consume within one month for best quality.
Reheating Graveyard Dirt Cups
- Oven: Not applicable as these are served cold. Avoid heating altogether.
- Microwave: Not recommended; serve chilled for optimal taste and texture.
- Stovetop: Not applicable; this recipe is designed to be enjoyed cold.
Frequently Asked Questions
Here are some common questions about making and serving Graveyard Dirt Cups.
Can I make Graveyard Dirt Cups ahead of time?
Yes, you can prepare these cups a day in advance. Just store them in the refrigerator until ready to serve.
What can I substitute for Oreos?
You can use chocolate chip cookies or graham crackers instead of Oreos for a different twist on your Graveyard Dirt Cups.
How long do leftovers last?
Leftover Graveyard Dirt Cups should be consumed within three days when stored properly in an airtight container in the refrigerator.
Can I use different flavors of pudding?
Absolutely! Vanilla or butterscotch pudding can provide a delicious variation while still maintaining that fun layered look.
How do I make these dairy-free?
To make dairy-free Graveyard Dirt Cups, use plant-based milk and non-dairy whipped topping as substitutes for traditional dairy ingredients.
Final Thoughts
Graveyard Dirt Cups are not just a delightful Halloween treat; they offer endless customization options that invite creativity. From different pudding flavors to unique toppings, you can make them your own. Try out this easy recipe and impress your family and friends with this spooky dessert!
Graveyard Dirt Cups
Create spooky Graveyard Dirt Cups with creamy chocolate pudding and crushed Oreos. Perfect for Halloween! Try this fun recipe today!
- Prep Time: 15 minutes
- Cook Time: 0 minutes
- Total Time: 15 minutes
- Yield: Serves 4
- Category: Dessert
- Method: No-bake
- Cuisine: American
Ingredients
- 1 (3.9 oz) box chocolate pudding mix
- 2 cups whole milk
- 15 Oreo cookies, crushed
- 10 pectin-based gummy candies
- 1 cup whipped topping
Instructions
- In a mixing bowl, whisk together the chocolate pudding mix and cold milk until smooth. Let it sit for about 5 minutes until thickened.
- Crush the Oreo cookies into fine crumbs using a food processor or by placing them in a resealable bag and smashing them with a rolling pin.
- In clear plastic cups, layer the chocolate pudding at the bottom followed by crushed Oreos. Repeat until cups are filled.
- Top each cup with whipped topping to create a ghostly effect.
- Decorate with pectin-based gummy candies on top to resemble creatures crawling out of the ‘dirt.’
- Chill in the refrigerator for at least one hour before serving.
Nutrition
- Serving Size: 1 serving
- Calories: 310
- Sugar: 24g
- Sodium: 180mg
- Fat: 14g
- Saturated Fat: 7g
- Unsaturated Fat: 7g
- Trans Fat: 0g
- Carbohydrates: 42g
- Fiber: 2g
- Protein: 4g
- Cholesterol: 20mg